How to Set Up Free Shopping Search on Google Merchant Center from Your WooCommerce Store
Did you know that you can now set-up Google Shopping Search for your ecommerce store for free? While this can be complex and a bit technical to do, it’s worth setting up. We’ve noticed that Google typically shows the product carousel data generated from products in the Google Merchant Center first, pushing your organic SEO down. Being ranked #1 organically is becoming less relevant for high qualified product searches due to this change. By adding your online store’s data to Google Shopping Search, you have a chance to land in the carousel of products.
Since Google has now made the ability to upload your products free in its Merchant Center to potentially show up in a shopping search, it’s worth doing. It can also be a great no-cost way to test which products perform best before determining where to put actual ad dollars.
Setting it all up is a bit technical, but we’re here to walk you through the steps to get it right.
Here’s what you’ll need to have ready for set up:
– Access to your store platform
– Product feed: to send all your product info to Google Merchant Center (this is the most challenging piece!)
– Google Merchant Center account
– Google Ads account
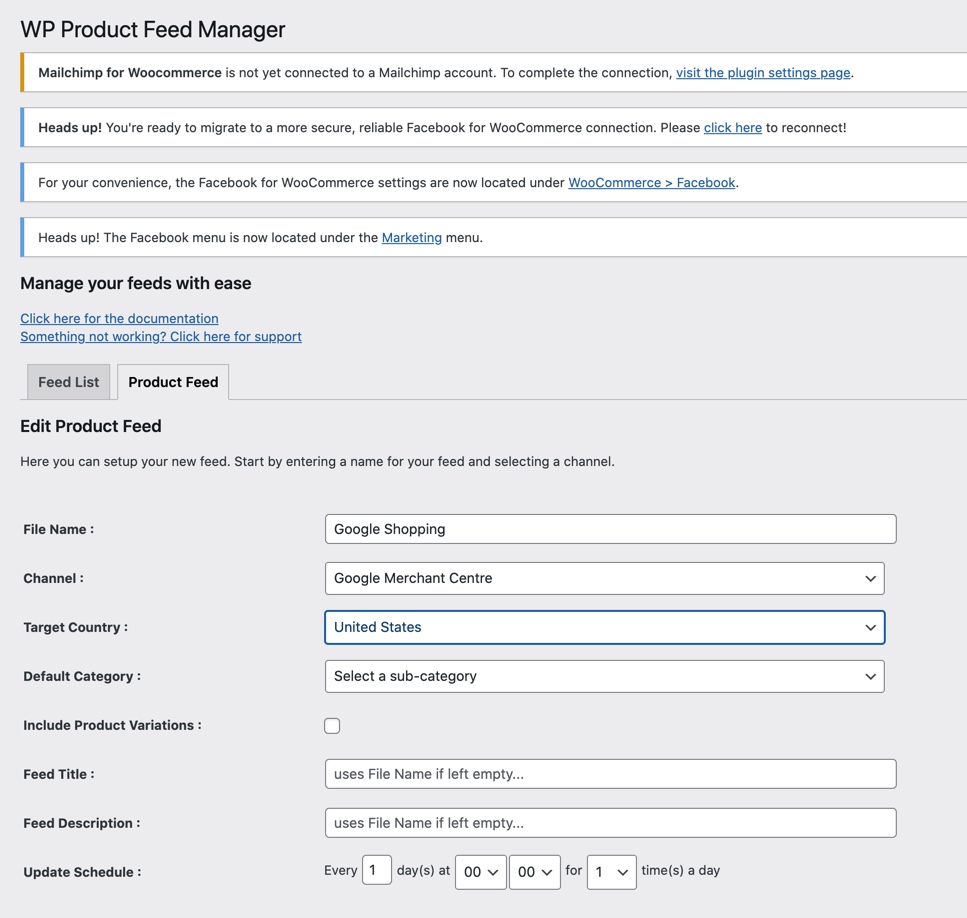
Step 1: Create a Google Shopping Product Feed from WooCommerce
A product feed is the file you need to provide to Google that contains all of your product information from your WooCommerce store. This is the most challenging part of the Google Shopping process to do. Your product feed must follow Google’s guidelines 100% to meet Google’s approval. There can be no missing data. We can help you create your product data file and have assisted our customers with this step.
Fortunately, WooCommerce has a a couple of plugins that makes the process of creating your product feed file much easier:
– WooCommerce Product Feed PRO
– WooCommerce Google Feed Manager
Step 2: Create a Google Merchant Center Account
If you have not done so already, go to Google Merchant Center and set up an account.
Once you’ve created your account, the set-up is relatively straightforward. If you have not already, you may need to claim your URL. This proves to Google that you actually own the domain you want to advertise on. You can access Google Analytics or Google Tag Manager to verify ownership.

Within Google Merchant Center you will need to:
– Configure your shipping settings
– Configure your tax settings (US only)
– Upload your product feed
The last step is where the trouble often occurs. Once Google Merchant Center processes your data, it will let you know if there are errors to correct. Errors indicate that there is incorrect or missing data. Or the data is not in alignment with Google’s product data requirements. While some issues will be easy to resolve, it can get complex. We can help you with this step of getting your data product feed to work with Google Merchant Center, as it’s often where ecommerce store owners get stuck and become frustrated.
You can spend a lot of time trying to troubleshoot how to fix your data file to align with Google’s requirements. We can help you with this step. If you run into roadblocks, just contact us to help you out.
Step 3: Create a Google Shopping Campaign
Once you’ve worked out any data feed issues and your products are approved in Google Merchant Center, you can setup up a Google Shopping Campaign. You’ll need to setup up a Google Ads account here if you have not already. You can use the configuration wizard to enter your business and payment information and setup a dummy campaign (note: you’ll want to pause the dummy campaign you setup).
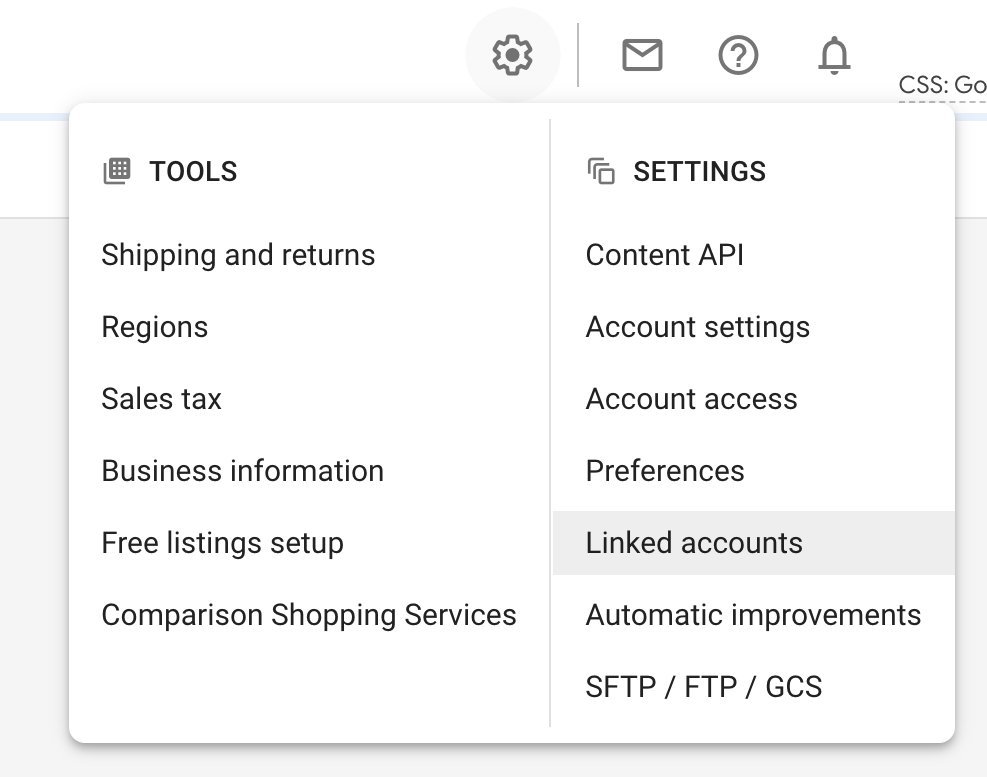
To be able to promote your products in Google Shopping, you’ll have to link Google Merchant to Google Ads. Click the gear icon in the top right corner of Google Merchant Center and select Settings>Linked Accounts to do so by adding your 10-digit Google Ads customer ID.
Now, within Google Ads, click the blue plus sign to create a new campaign and select “Shopping Campaign.” Walk through the steps to create a campaign using the product feed we setup within Google Merchant Center. Be sure to pick a very small daily budget to start. We recommend $5-$10/day. Set a cost per click of $0.5/click or less. Choose Manual CPC for your bidding strategy. Now your Shopping campaign will begin showing your ads.
Step 4: Optimize Google Shopping Campaign
Let your campaign run for a week or more to gather some data to make optimization decisions. Let the data you gather help inform your next steps. Once you have some data, you’ll see that one product or product group may be taking up the majority (or all of) the budget. Increase CPCs for items with few to no impressions and clicks. Decrease the CPCs for those with lots of clicks. Try to get visibility and clicks for all of your products, if possible. Be careful to only increase your ad spend once you have a strong handle on how your ads are performing and converting. You can easily throw a lot of money away on Google Shopping campaigns.
We hope this article was helpful to you as you explore the world of Google Shopping!
As an ecommerce consulting agency, we know it can be challenging to put all the pieces of the puzzle together for your ecommerce strategy. We’re here to help if you need us.